
Email Cloud Content
Oracle Marketing Cloud - Eloqua
Personalization Manager
The Personalization Manager Email Cloud Content app lets you personalize email communications for each contact that is linked to the same email address using Eloqua Custom Object data field merges for the current record that is being processed.
App Configuration
Step 1: Add the Cloud Content to Your Email
Within the Eloqua email editor, drag the Cloud Content design component onto your email asset. Click Browse and select the Personalization Manager app.
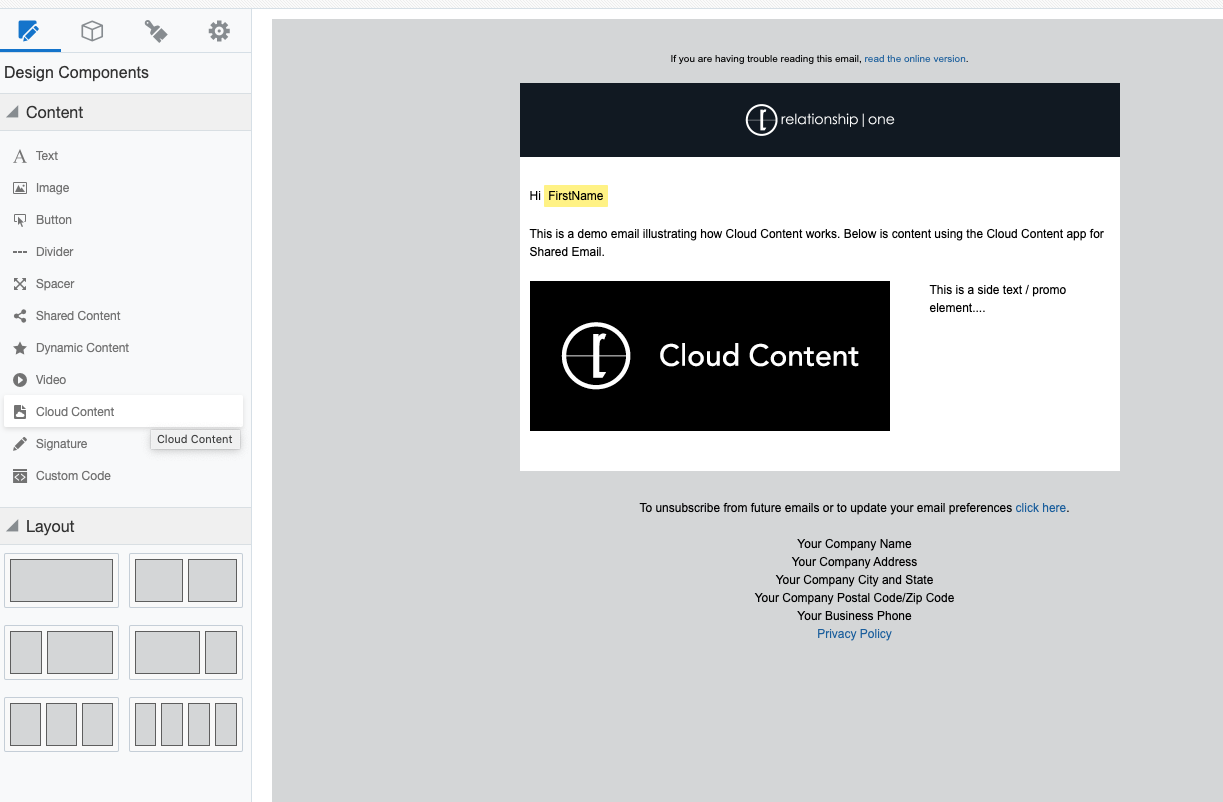
Click the Configure button to configure your Cloud Content settings.
Step 2: Configure Cloud Content Settings
First, use the search area below to search for your Personalization Manager configuration and associated Eloqua campaign. This is the descriptive name you assigned in Step 3 of Record Selection.
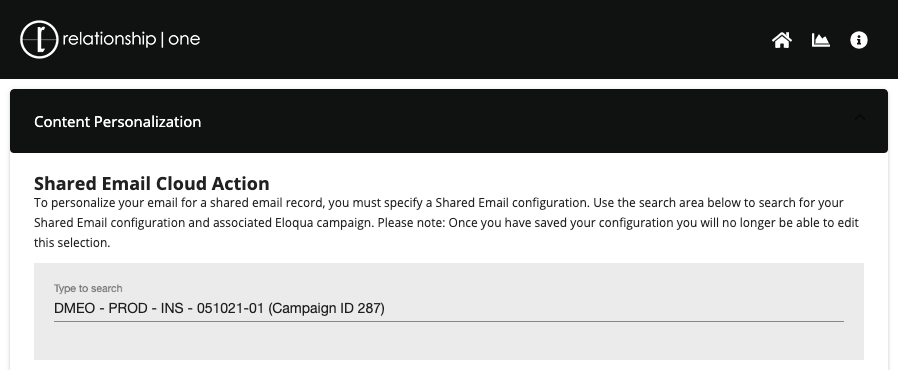
Configuration NoteOnce you have saved your configuration you will no longer be able to change your linked Personalization Manager Cloud Action.
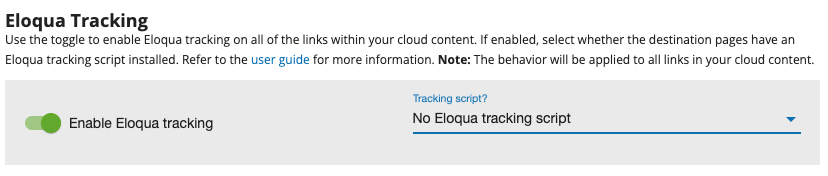
Second, optionally use the toggle to enable Eloqua's dynamic link tracking features. If enabled, select if the destination page(s) have an Eloqua tracking script installed. Based on your selections, the app will automatically append the appropriate Eloqua tracking parameters to all links in the Cloud Content. Eloqua-hosted files are recommended to use the file's 'Actual URL' provided by Eloqua, enable the Eloqua Tracking toggle, and choose 'No Eloqua tracking script'.
If you wish to handle links on the same Cloud Content differently, it is recommended to leave this feature disabled and manually adjust your links accordingly. For more information, see Eloqua's documentation (the green 'Notes' section near the bottom).
Third, optionally add Roll-up Grouping. For more information, see the Roll-up and Roll-up Grouping section of this user guide.
Step 3: Personalize Content
Use the rich text editor to create the content that should be added to your email. You can personalize this content with Eloqua Custom Object Fields by dragging the field merges into the editor. Additionally, you can add roll-up merge fields, formula fields, or Eloqua Contact fields by selecting the relevant category in the 'Select Source' dropdown of the Field Merges column.
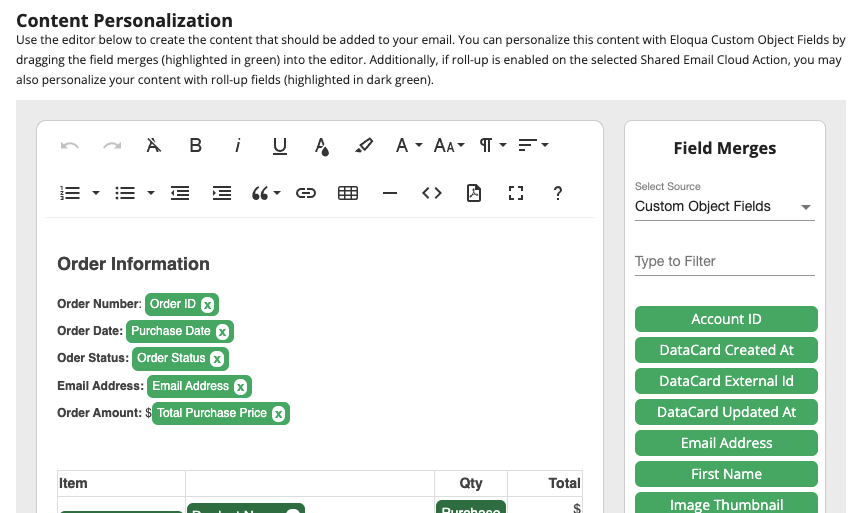
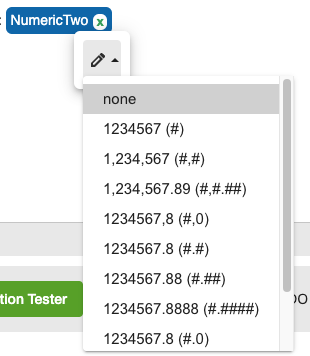
Date/Time Numeric fields can be further customized to control the format of that specific instance of a field merge by clicking on the field merge and selecting the desired format.
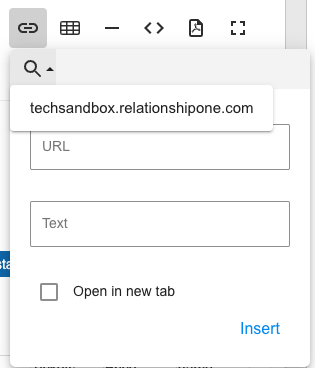
To add a dynamic link or a link to your landing page with cloud content, click the () button and then the () icon and select you link from the list.
To remove a field merge, click the X.
When finished, click the Save button to save your Cloud Content configuration.
For additional information related to using Roll-up fields, see our page Roll-up and Roll-up Grouping
Personalization Tester
The Personalization Tester allows you to send a test email to yourself or others to see how your Personalization Manager email Cloud Content will appear.
Testing Landing PagesThe Personalization Tester does not currently support landing page cloud content. In order to test landing page cloud content, test record(s) must be run through a campaign.
Step 1: Open the Personalization Tester
To access the Personalization Tester, configure the Cloud Content on your Email. Note: testing landing page content is not supported at this time. At the bottom of the Cloud Content, click the green 'Launch Personalization Tester' button. If the button is disabled, your campaign needs to first be deactivated before launching testing.

Step 2: Select Send To Contact
Enter the email address where you wish the test email to be sent. This is likely your own email address or someone else from your team. Then, click 'Next'.

Step 3: Specify Test Records
Enter the email address of the Eloqua contact that should be used for testing their mapped CDO records. Optionally, you may select a limit for the maximum number of emails to send. The tester will only send up to the maximum specified, even if the configuration would otherwise send more. Then, click 'Next'.

Step 4: Review and Run Test
Review your test configuration and make any changes necessary by clicking 'Prev' to return to previous steps. If your test configuration is correct, click 'Run Test'. Please note, if a test is already in progress, you must wait for it to finish processing before starting another.
Step 5: Results
You should receive your test email(s) in just a few moments, followed by a summary email detailing the results of the test. NEW Testing landing pages is now supported! Links in test emails to Eloqua Landing Pages containing Personalization Manager Cloud Content will now populate with data from the Test Record contact. If your test results were not as expected, return to your campaign and review the Personalization Manager Action and Decision steps, as well as the email and Cloud Content to ensure they have all been configured correctly.
Testing content outside of Cloud ContentPlease not that the content on your test email and landing page will not correctly reflect the field merges and personalization for your Test Record contact. The Personalization Tester is only intended to test Cloud Content managed by the Personalization Manager app.

Cloud Content AppStats Reporting
To view Cloud Content activity, click on the chart icon. The stacked column chart will visually show:
- Emails sent with Cloud Content generated content in Blue
- Emails sent with Blank content in Green
- Any records failures indicating emails were not sent in Dark Orange
- Any records rejected by Eloqua and not sent in Light Orange
You can change the date by selecting the date picker or using the Prev or Next buttons.
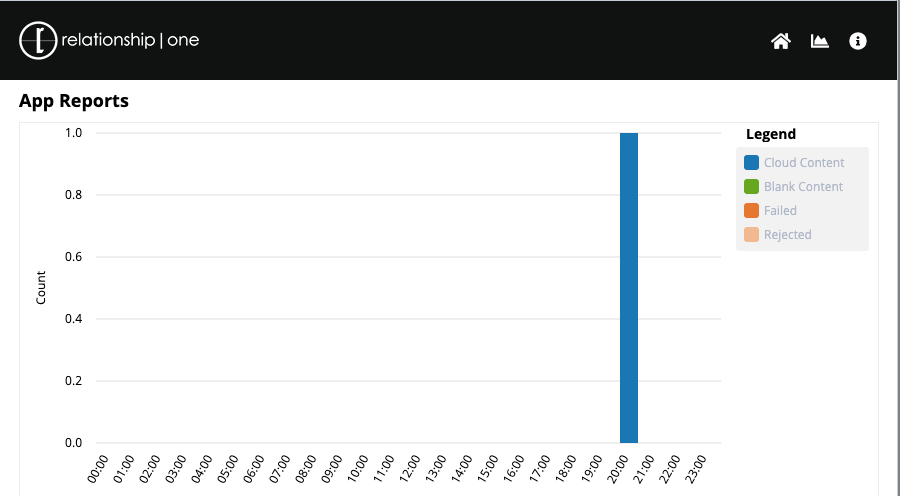
To view more information about records imports, exports, successes, failures, etc. click on the desired table row.

Updated about 1 year ago