
Google Ads Custom Audiences for Responsys
Oracle Marketing Cloud - Responsys App
Subscription RequiredThe Google Ads Custom Audiences app is a premium app and requires a subscription. To see subscription options or to start a trial, visit our AppCloud. If you don't have an AppCloud account, you'll need to create one first...but no worries, this app may require a subscription but you can create an AppCloud account for free!
Controlled AvailabilityThe Google Ads Custom Audiences app is in controlled availability. To request access to this app, please submit a support request or contact your Relationship One account manager.
App Overview
As part of a Responsys program flow, you can now add or remove campaign members to one or more Google Ads custom audiences lists. The app even lets you create new custom audience lists. To use this app, you will need to have a Google Ads account that allows you to use custom audiences.
Per Google, Customer Match is not available for all advertisers. To use Customer Match, your account must have:
- A good history of policy compliance.
- A good payment history.
- At least 90 days history in Google Ads.
- More than USD 50,000 total lifetime spend. For advertisers whose accounts are managed in currencies other than USD, your spend amount will be converted to USD using the average monthly conversion rate for that currency.
If your Google Account has been enabled for Customer Match, this app is for you!
App Installation
To install the Google Custom Audiences app:
- Click on the install URL below:
https://ams.oraclecloud.com/ams/applications/install/c4eb3793-c1d2-4955-ad4f-79741125ef72
IP AllowlistingIf you have IP allowlisting enabled, please add AppCloud IPs to your allowlist - 44.236.213.84 and 44.238.209.213.
Please note, the installation process must be done by a user with UPDATE (AUTHORIZATION)
-
Log into Responsys with your Responsys Credentials, if required.
-
Click Install to add the app to your Responsys instance.
-
Find the app in your installed applications list and click the Configure button.
-
Sign in with your Relationship One AppCloud account when prompted.
-
Click Sign in with Google to allow the app to communicate with your Google Ads account on your behalf.

- If you are using a Google Ads Manager Account, enable the Manager Account toggle and enter the Account ID for the Manager Account.

-
Click Add Account to add the Google Ads account(s) you wish to manage with the app. For each, enter both the Google Account ID as well as a display name for easier reference later.
-
Click Save to finish the app installation process.
The Relationship One Google Ads Custom Audiences app is now installed in the App Catalog inside of your Responsys instance which can be found by clicking on App management under the Account menu in the left-hand navigation menu. You can select the app to view the app description, modify the configuration settings, or uninstall it. You can also check its status and dependencies.
Activity Configuration
Step 1: Ensure Records have an Email Address
Google Ads uses a hashed version of the email address for audience matching. If the contact entering the app step does not have an email address, the app will be unable to send them to Google Ads for matching. A simple way to ensure contacts have an email address is to utilize a Data Switch immediately prior to the app step. This also allows for those contacts which do not have an email address to be orchestrated as appropriate for your needs. Records without an email address will be marked as errored by the app step.
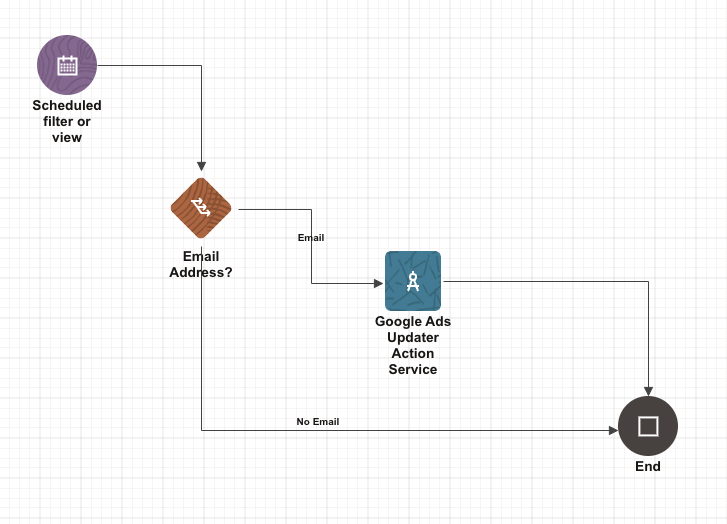
Step 2: Add the Apps Activity
Within the Responsys Program, find the Apps Activity and drag it onto the canvas. Double click the Activity, select the Google Ads Custom Audiences app from the list, and click Done. Then, in the new popup click Configure app.
Step 3: Select Google Ads Account
From the list configured in the App install, choose the Google Ads account you wish to use for the Activity.

Step 4: Select Action (Add or Remove)
Choose the type of action for the Activity to take. Select the Add action to add Campaign members to one or more Google Ads Custom Audiences lists. Select the Remove action to remove Campaign members to one or more Google Ads Custom Audiences lists.

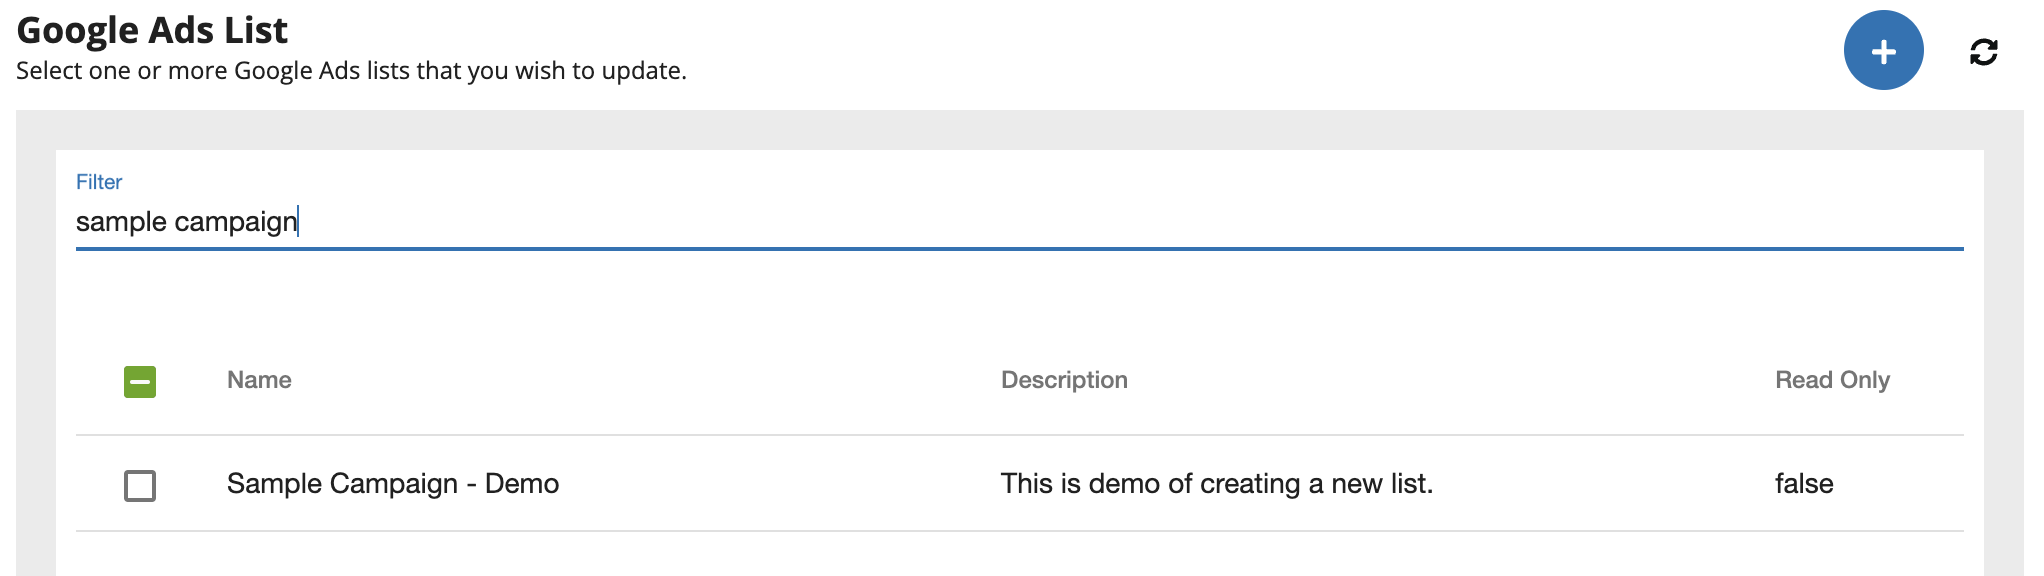
Step 5: Select Lists or Add New
Finally, select the Google Ads list(s) to add or remove the contacts. If desired, you can create a new list directly from the app clicking the blue + button. Provide a List Name and, optionally, a List Description.
Step 5: Save
Click Save to complete your app configuration. The Cloud Action will automatically enable when you publish the Program.
Step 6: Reporting
Detailed app reporting can be found in the app configuration by clicking on the chart icon.
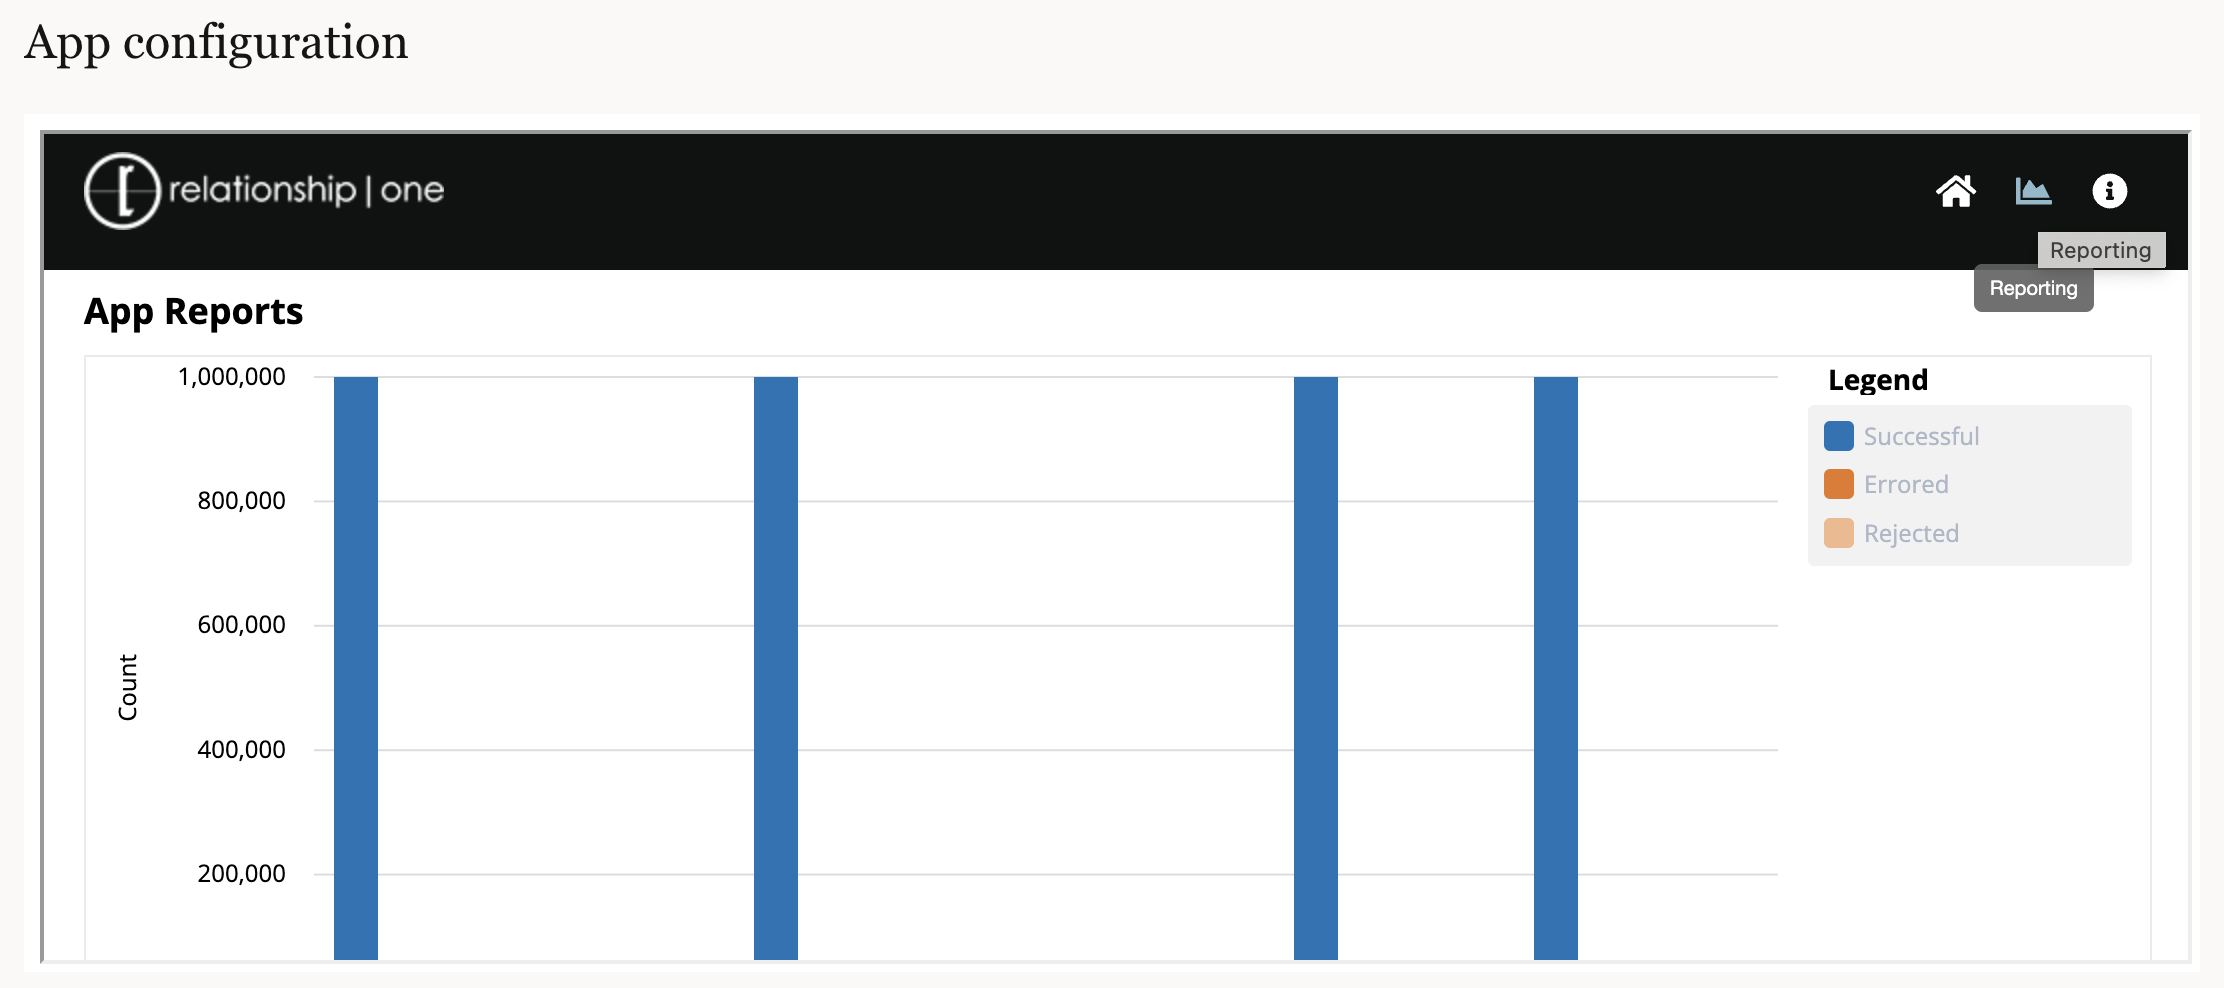
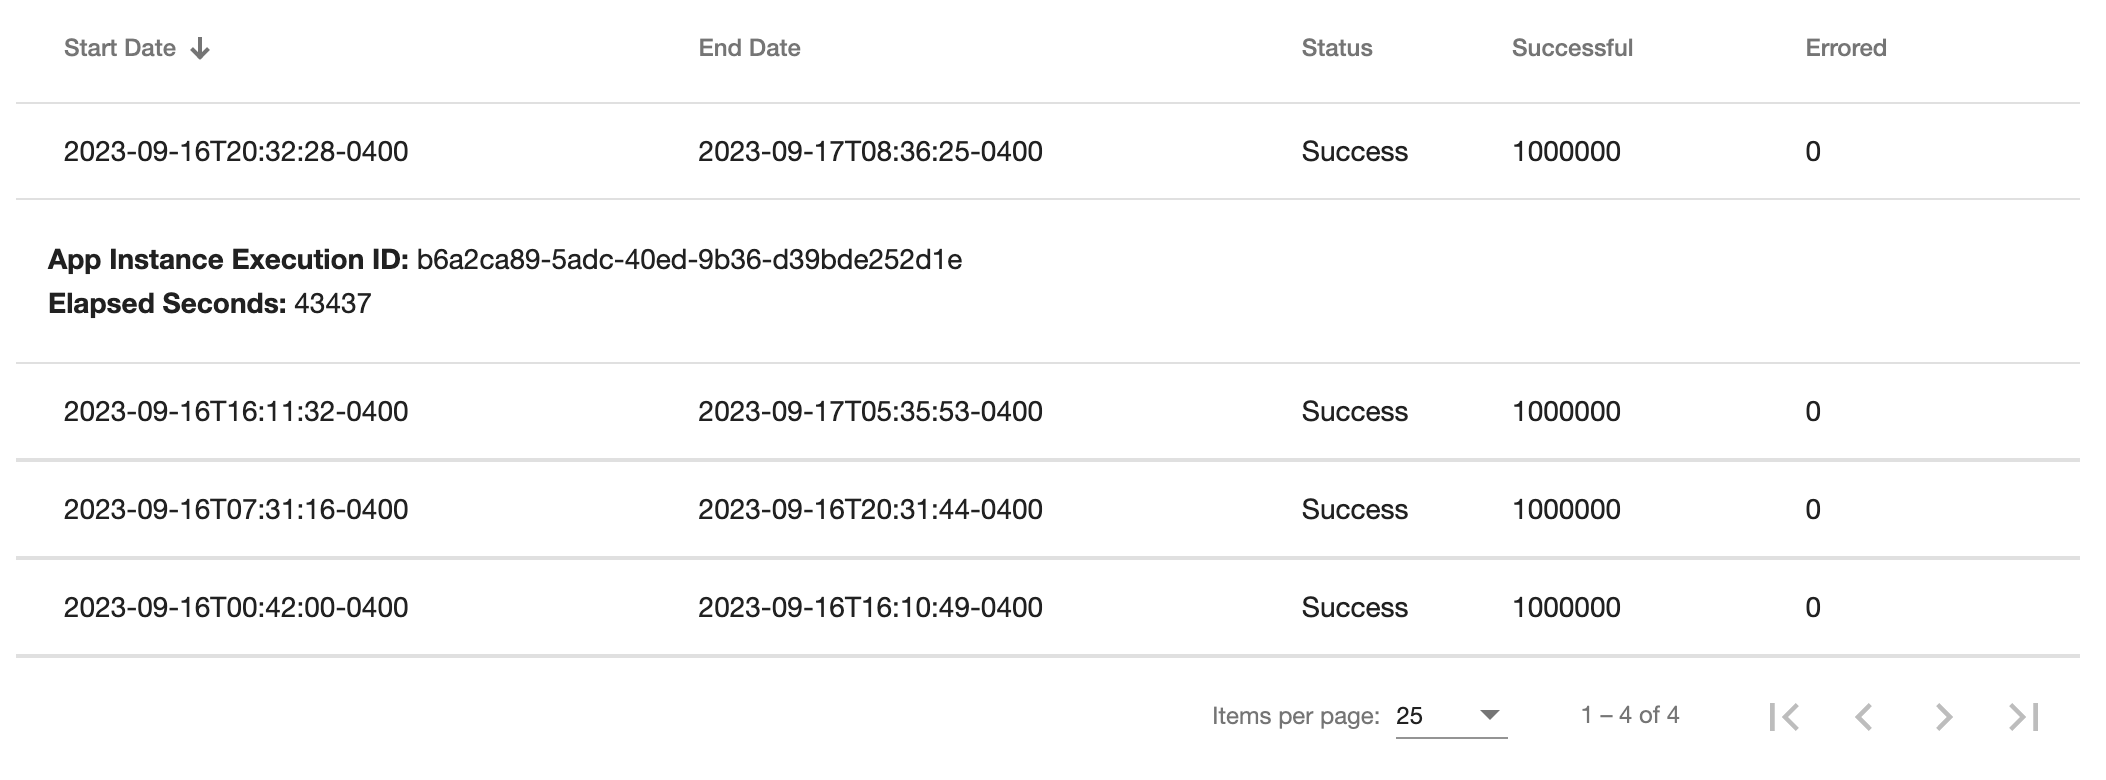
Navigate to the processing date of interest and view the results. In the table below the chart, rows can be expanded by clicking on them for greater detail.
Updated over 1 year ago